A little leftover yarn can become something surprisingly useful. With just a few simple crochet stitches, you can make a collection of mathematical symbols to decorate a school bag, personalize a classroom project, or add a playful detail to a handmade gift.
This crochet math symbol applique pattern shows you how to make five familiar signs: plus (+), minus (−), equals (=), multiplication (×), and division (÷).
The best part? You don’t need to learn five completely different crochet patterns.
We’ll start by making a simple rectangular strip using single crochet stitches. Then we’ll arrange those strips in different ways to form the mathematical symbols. The division sign needs two additional little circles, but those are quick to make, too.
This method is especially helpful for beginners because it lets you practice one technique before moving on to the next.
You’ll learn how to keep your stitches even, make matching strips, arrange the symbols correctly, and attach the finished appliques to fabric.
The tutorial also includes 14 planned photo placements to make the instructions easier to follow visually.
Whether you’re making a thoughtful gift for a math teacher or simply looking for a creative way to use scrap yarn, this small crochet project is a lovely place to begin.
What You’ll Learn
By following this tutorial, you’ll learn how to:
- Make a foundation chain and work basic single crochet stitches.
- Crochet a narrow rectangular strip with straight edges.
- Turn matching strips into five different mathematical symbols.
- Make small circular crochet dots without a magic ring.
- Position and secure crocheted pieces neatly.
- Sew appliques onto bags, blankets, pencil cases, and other fabric projects.
- Adjust the size and colors of your finished symbols.
This is a beginner project, but it also offers useful practice for anyone who wants to improve their stitch tension and finishing skills.
Crochet Math Symbol Pattern at a Glance
| Pattern Detail | Information |
|---|---|
| Skill level | Beginner |
| Project type | Flat crochet applique |
| Yarn | DK cotton, Category 3 |
| Hook | 3.5 mm |
| Main stitch | Single crochet |
| Construction | Rectangular strips and small circles |
| Symbols | +, −, =, ×, ÷ |
| Time | About 60–90 minutes for the set |
| Gauge | Not critical |
| Terminology | US crochet terms |
The pattern creates eight rectangular strips and two circular dots. These components are then arranged into five different symbols.
For the most consistent results, use the same yarn and hook for every piece.
Materials You’ll Need
You won’t need much yarn for this project. In fact, it’s an excellent opportunity to use those little leftovers that aren’t quite enough for a larger crochet project.
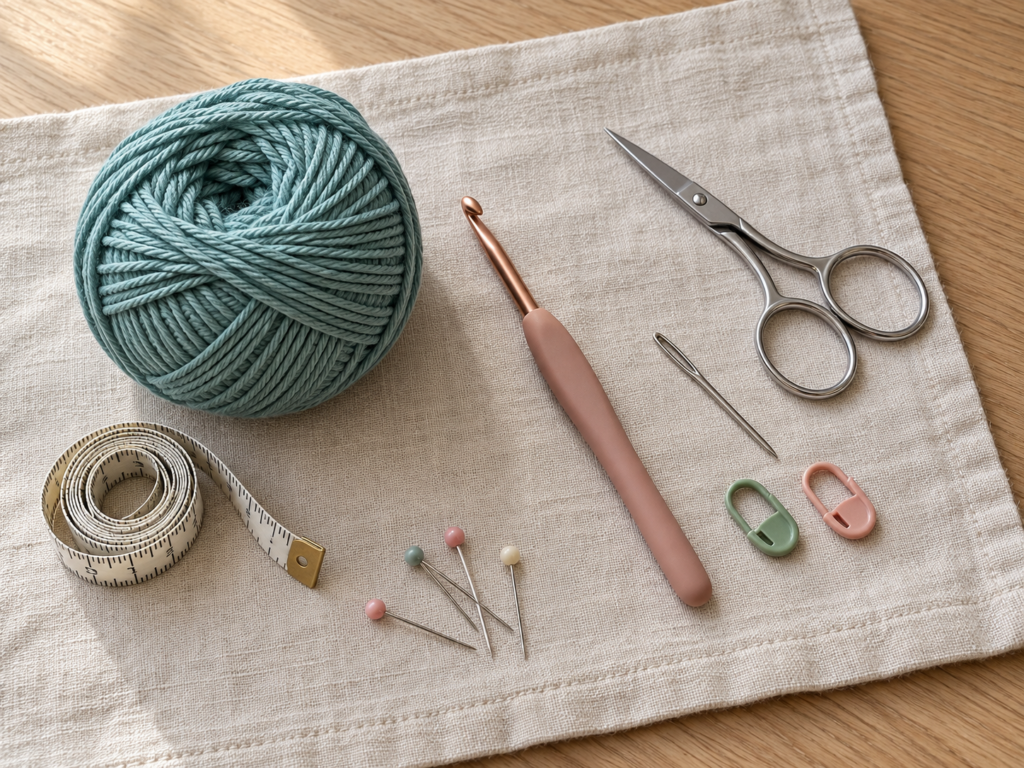
Yarn
Choose a smooth DK weight cotton yarn.
Cotton is a particularly good choice for appliques because it shows stitch definition clearly and generally holds its shape well.
For this tutorial, the suggested color is dusty teal. It’s soft enough for home decor but still stands out nicely against cream, white, or natural-colored fabric.
You can also use bright primary colors if you’re making educational decorations.
Approximately 15–25 grams of DK cotton should be more than enough for a small set, although actual usage depends on your yarn and tension.
Crochet Hook
Use a 3.5 mm crochet hook.
If your stitches feel extremely tight, try a 4 mm hook. If the fabric looks too loose or floppy, experiment with a 3 mm hook instead.
You want the fabric to be firm enough to hold its shape without becoming difficult to work into.
Additional Supplies
- Small sharp scissors
- Blunt tapestry or yarn needle
- Two removable stitch markers
- Measuring tape
- Sewing pins for temporary positioning
- A flat towel or blocking mat
- Optional cotton tote bag, blanket, or other fabric project for attaching the symbols
A tapestry needle is especially important because some symbols require two pieces to be secured together.
Crochet Abbreviations Used
This pattern uses US crochet terminology.
| Abbreviation | Meaning |
|---|---|
| ch | Chain |
| sc | Single crochet |
| sl st | Slip stitch |
| st / sts | Stitch / stitches |
| rep | Repeat |
If you’re familiar with UK crochet terminology, remember that the US single crochet stitch is called a double crochet in UK patterns.
All instructions below use US terms only, so there’s no need to switch between systems while working.
How to Make a Single Crochet
If you’re completely new to crochet, here’s a quick reminder.
Insert your hook into the indicated stitch. Yarn over and pull up a loop. You should now have two loops on your hook.
Yarn over again and pull through both loops.
You’ve made one single crochet stitch.
This small, compact stitch is ideal for the narrow bars in our mathematical symbols.
Before You Start
There are a few simple things worth checking before making your first applique.
Gauge and Tension
Gauge refers to how many stitches and rows fit into a measured area.
For this project, exact gauge isn’t essential because the finished pieces are decorative rather than fitted.
However, consistent tension is important.
Every rectangular strip should have approximately the same length and width. If one strip is noticeably longer, your finished plus or multiplication sign may look uneven.
The easiest solution is to use the same yarn, hook, and stitch count throughout.
How to Count Your Stitches
Look at the top of a completed single crochet row.
You’ll see a series of small V-shaped loops. Each V represents one stitch.
Our rectangular strips will contain 14 single crochet stitches per row.
It’s helpful to count after completing every row, especially when you’re learning.
If you accidentally skip the last stitch, your strip may gradually become narrower.
If you work an extra stitch into the turning chain, it may become wider.
How to Keep Your Edges Straight
The turning chain is important.
At the end of a row, you’ll make one chain and turn your work before beginning the next row.
That chain provides a little height for the next row, but it does not count as a single crochet stitch in this pattern.
Work your first single crochet into the first actual stitch, not into the turning chain.
How to Avoid Curling
Small crochet pieces sometimes curl slightly, especially when worked with tight tension.
Don’t worry if your first strip doesn’t lie completely flat.
Try loosening your foundation chain a little, keeping your working yarn relaxed, and gently flattening the finished piece.
Light blocking can help later.
Choosing Colors
For a coordinated set, use one color for all five signs.
If you’re making classroom decorations, you could use a different color for each operation.
The important thing is to keep the yarn weight and hook size consistent so that the symbols remain approximately the same scale.
Step-by-Step Crochet Tutorial
We’re going to begin with the basic strip used throughout the project.
Once you’ve learned this part, most of the work is simply repeating the same three rows.
Step 1: Make Your Foundation Chain
Start with a slip knot.
Place the slip knot onto your crochet hook and gently tighten it so the loop sits comfortably around the hook.
It should be secure, but still able to slide.
Now make 15 chain stitches.
To make a chain, yarn over and pull the yarn through the loop already on your hook.
Repeat until you have 15 chains.
Lay the chain flat on your work surface and look at it carefully.
It should resemble a narrow row of little V shapes.
Try not to pull the chain too tightly. A very tight foundation chain can make the first row difficult to crochet and may cause the finished strip to curve.
Beginner tip: Count your chains slowly. The loop currently sitting on your hook does not count as a chain stitch.
Common mistake to avoid: Don’t twist the foundation chain before beginning your first row.
Step 2: Work Your First Single Crochet
Now we’re ready to make the first stitch.
Look at your foundation chain and find the second chain from your hook.
Remember, the loop sitting on the hook is not counted.
Insert your hook into that second chain.
Yarn over and pull up a loop. You should have two loops on your hook.
Yarn over again and pull through both loops.
You’ve completed your first single crochet.
Take a moment to look at the stitch. It should sit neatly against the foundation chain without pulling it out of shape.
Beginner tip: If you find it difficult to insert your hook into the chain, try making the foundation chain a little looser next time.
Common mistake to avoid: Working into the first chain instead of the second will change the intended stitch count.
Step 3: Complete the First Row
Continue making one single crochet into each remaining chain.
Work steadily across the foundation chain until you reach the end.
You should have 14 single crochet stitches.
Before moving on, count them.
It’s easier to correct a missed stitch now than after you’ve completed several rows.
Your work should resemble a narrow, slightly flexible strip.
It may curve a little because it’s only one row tall. That’s normal.
Don’t try to stretch it forcefully. Instead, gently straighten it between your fingers.
Beginner tip: Place a stitch marker into the first stitch if you have trouble identifying the beginning of your row.
Common mistake to avoid: Be careful not to skip the final chain, which can sometimes look smaller than the others.
Step 4: Crochet Rows Two and Three
Now we’ll make the strip wider.
At the end of Row 1, chain one and turn your work.
Row 2: Work one single crochet into each of the 14 stitches across. You should still have 14 stitches.
Chain one and turn.
Row 3: Work one single crochet into each stitch across again. You should have 14 stitches.
Your strip now contains three rows of single crochet.
Fasten off by cutting the yarn, leaving a tail long enough for sewing. Pull the cut yarn through the final loop and tighten gently.
For most pieces, a tail of approximately 20–25 cm (8–10 inches) is convenient.
The completed strip should look like a small, flat rectangle.
Beginner tip: Keep the turning chains relaxed. Tight turning chains can pull the corners inward.
Common mistake to avoid: Don’t count the chain-one turning chain as an additional stitch.
Step 5: Check the Shape and Measurements
Place your completed strip on a flat surface.
Gently smooth it with your fingers.
Check that the long edges are reasonably straight and the corners aren’t pulling inward.
You don’t need a perfectly rigid rectangle. Handmade crochet naturally has a little flexibility.
What matters most is that your strips look similar.
Measure the first strip and use it as a guide when making the remaining pieces.
If your next strip is significantly longer or shorter, compare your stitch counts and tension.
Beginner tip: Keep the first completed strip beside you as a visual reference.
Common mistake to avoid: Don’t pull a short strip longer to force it to match another. Adjust your tension or remake the piece instead.
Step 6: Make Eight Matching Crochet Strips
Now that you’ve completed the first strip, repeat the same pattern until you have eight matching rectangles.
Each strip follows these instructions:
Foundation: Chain 15.
Row 1: Single crochet in the second chain from the hook and in each remaining chain. (14 sc)
Row 2: Chain 1, turn, single crochet in each stitch across. (14 sc)
Row 3: Chain 1, turn, single crochet in each stitch across. (14 sc)
Fasten off, leaving a sewing tail.
You will use these strips as follows:
- Plus sign: 2 strips
- Minus sign: 1 strip
- Equals sign: 2 strips
- Multiplication sign: 2 strips
- Division sign: 1 strip
That’s eight strips in total.
Try laying them side by side as you finish each one.
If they look similar in length and width, you’re ready to assemble your math symbols.
Step 7: Make the Crochet Plus Sign (+)
The plus sign is one of the easiest shapes to assemble.
Take two completed rectangular strips.
Lay the first strip horizontally on your work surface.
Now place the second strip vertically across the center of the first.
The two strips should form a recognizable plus sign, with approximately equal arms extending in all four directions.
Adjust their position until the center looks balanced.
Because each strip contains 14 stitches, the midpoint lies between the seventh and eighth stitches along its length.
You don’t need to count the center perfectly every time, but this is a useful reference.
Once you’re happy with the shape, secure the overlap temporarily with a sewing pin.
Thread one of the yarn tails through your tapestry needle.
Make several small stitches through both layers at the center, keeping your sewing yarn mostly hidden between the stitches.
Remove the pin when the strips are securely connected.
If you’re attaching the plus sign to a bag or blanket, you can also secure the individual arms while sewing the applique onto the larger project.
Beginner tip: Look at the symbol from directly above before sewing. It’s easier to see uneven arms from this angle.
Common mistake to avoid: Don’t pull the sewing yarn too tightly. This can make the center pucker.
Step 8: Make the Crochet Minus Sign (−)
The minus sign is even simpler.
Take one completed rectangular strip and lay it horizontally.
That’s the basic shape of your subtraction symbol.
Check that both ends are straight and the strip lies reasonably flat.
You can gently smooth the edges with your fingers or lightly block the piece before attaching it.
There’s no need to sew multiple components together.
If you’re making a set of educational appliques, position the minus sign at the same visual height as your plus and equals signs.
This will help the finished collection look coordinated.
Beginner tip: A slightly firmer stitch tension can help the minus sign hold its rectangular shape.
Common mistake to avoid: Don’t make the minus sign much longer than the other bars unless you’re deliberately creating an oversized version.
Step 9: Make the Crochet Equals Sign (=)
For the equals sign, you’ll need two matching strips.
Lay both strips horizontally, one above the other.
Keep them parallel.
Leave a small, even gap between the strips. A gap approximately equal to the height of one crocheted bar is a useful starting point.
Align the left ends, then check the right ends.
The two strips should be the same length.
Unlike the plus sign, the equals sign doesn’t have a central overlap. Its two bars remain separate until they are attached to a background.
This is important if you’re planning to use the symbols as individual decorative pieces.
For a tote bag, blanket, or fabric panel, pin both strips in place and sew around their edges.
If you want a removable educational piece, attach the bars to a small fabric or crocheted backing so they remain correctly spaced.
Beginner tip: Measure the gap at both ends before sewing to keep the strips parallel.
Common mistake to avoid: Don’t sew the two bars at an angle. Even a small difference in spacing can make the equals sign look uneven.
Step 10: Make the Crochet Multiplication Sign (×)
The multiplication sign uses two strips, just like the plus sign.
The difference is their direction.
Lay the first strip diagonally from the upper left to the lower right.
Place the second strip diagonally from the lower left to the upper right.
They should cross in the center to form an X.
Adjust the angle until the four arms appear balanced.
Ideally, the two strips should cross at approximately 90 degrees, with each strip positioned diagonally relative to the horizontal.
Pin the center temporarily.
Using a yarn needle and matching yarn, make a few small stitches through the overlapping sections.
Try to keep the sewing stitches hidden.
Remove the pin and check that the symbol holds its shape.
If the arms move too freely, add another securing stitch at the center.
Beginner tip: Place the symbol on a flat surface and compare the four open spaces around the center. They should look similar.
Common mistake to avoid: Don’t cross the strips too close to one end. That creates an unbalanced X with noticeably unequal arms.
Step 11: Crochet Two Small Dots for the Division Sign
The division sign needs one rectangular strip and two small circular dots.
We’ll make the dots using a simple chain-two method.
Start with a slip knot.
Round 1:
Chain 2.
Insert your hook into the second chain from the hook.
Work 6 single crochet stitches into that same chain.
As you add the stitches, they will begin forming a small circular shape.
Join with a slip stitch into the first single crochet.
Fasten off, leaving a sewing tail.
You now have one small crochet dot.
Repeat the same instructions to make a second dot.
Both dots should be approximately the same size.
If one looks larger, compare the stitch counts and check that you didn’t accidentally work an extra stitch.
The circles may look slightly uneven immediately after crocheting. Gently flatten them with your fingers.
Beginner tip: Keep the starting chain loose enough to accommodate all six single crochet stitches.
Common mistake to avoid: Don’t count the joining slip stitch as a seventh single crochet.
Step 12: Assemble the Crochet Division Sign (÷)
Take your final rectangular strip and lay it horizontally.
Place one circular dot directly above the center of the strip.
Position the second dot directly below the center.
The result should resemble the mathematical division symbol.
Check that both dots are centered and that the spacing above and below the bar looks balanced.
For a small applique, a gap of approximately 0.5–1 cm between each dot and the bar is a useful starting point, although the ideal distance depends on the size of your crochet pieces.
Pin the components onto your chosen backing or project.
Using the sewing tails, attach each dot securely.
Then sew the horizontal strip into place.
Make sure the dots stay centered as you work.
Beginner tip: Position all three pieces before sewing any of them down. This makes it easier to adjust the spacing.
Common mistake to avoid: Don’t attach the dots too far from the bar, or the division sign may look like three unrelated pieces.
Pattern Notes and Stitch Counts
Here is a quick technical reference for the complete set.
Rectangular Strip
Starting chain: 15 chains
Row 1: 14 single crochet stitches
Row 2: 14 single crochet stitches
Row 3: 14 single crochet stitches
Total rows: 3
Turning chain: Chain 1 between rows; does not count as a stitch.
Number of strips: 8 for the complete set.
Circular Dot
Starting method: Chain 2.
Round 1: 6 single crochet stitches in the second chain from the hook.
Joining method: Slip stitch into the first single crochet.
Number of dots: 2.
Right Side and Wrong Side
Single crochet fabric looks fairly similar on both sides, especially in a small three-row strip.
Choose the side that looks neatest as the right side of your applique.
For the most consistent finish, use the same side facing upward on all your symbols.
Repeat Notes
There are no complicated stitch repeats in this pattern.
The main rectangle simply uses one single crochet in every stitch across for three rows.
Once you’ve completed the first strip, you already know how to make the remaining seven.
Adjusting the Size
For a smaller symbol, try starting with 11 chains instead of 15. This creates 10 single crochet stitches per row.
For a larger symbol, try 19 chains, creating 18 single crochet stitches per row.
Keep the strip length consistent within each symbol.
You may also increase the number of rows if you want wider bars.
Remember that increasing the width changes the overall appearance, especially where two strips overlap.
Common Beginner Mistakes and How to Fix Them
Small projects are wonderful for practicing because mistakes are easy to spot and usually quick to correct.
Here are some of the most common problems you might encounter.
1. The Crochet Strip Gets Narrower
If your strip starts with 14 stitches but ends with only 13, you’ve probably missed a stitch at the edge.
This often happens because the last stitch of a row is slightly hidden.
How to fix it: Count your stitches after every row. If you’ve missed one, undo that row and work it again.
2. The Edges Look Uneven
Uneven edges are usually caused by inconsistent tension or accidentally adding extra stitches.
You might also be working into the turning chain.
How to fix it: Remember that the chain-one turning chain doesn’t count as a stitch. Work into the first actual single crochet stitch after turning.
3. The Strip Curls Too Much
A little curling is normal, but excessive curling can make the applique difficult to attach.
This may happen if your foundation chain is too tight or your stitches are worked with very firm tension.
How to fix it: Try a slightly larger hook, loosen your grip, or gently wet-block the completed strip.
4. The Plus Sign Looks Uneven
If one arm is much longer than the others, the two strips probably aren’t centered correctly.
How to fix it: Lay the strips flat and reposition them before sewing. Check the midpoint of each strip and compare the four arms.
5. The Equals Sign Isn’t Straight
The two bars may look uneven if one was crocheted more loosely than the other.
They may also be pinned at slightly different angles.
How to fix it: Compare the strips before attaching them. Use a ruler or the edge of your work surface to keep both bars parallel.
6. The Division Dots Are Different Sizes
Tiny circular motifs can look different if the tension changes between them.
An accidental extra stitch can also make one dot larger.
How to fix it: Count six single crochet stitches in each dot and use the same hook and yarn. Make both dots in the same crochet session if possible.
7. The Applique Puckers When Sewn Down
This usually means the sewing yarn has been pulled too tightly.
How to fix it: Use small, relaxed stitches. The applique should sit against the fabric without stretching or gathering it.
8. The Yarn Ends Become Visible
Short tails or loosely woven ends may work their way out.
How to fix it: Weave the tails through several stitches on the back, changing direction at least once. Trim only after the yarn feels secure.
How to Customize Your Crochet Math Symbols
One of the nicest things about this pattern is how easily you can change its appearance.
The basic construction stays the same, but the colors, sizes, and finishing details can be adapted to different projects.
Try Different Yarn Colors
For a playful classroom set, choose five bright colors.
You could make the plus sign yellow, minus sign coral, equals sign blue, multiplication sign green, and division sign purple.
For a more modern look, try a coordinated palette of sage, cream, terracotta, dusty blue, and mustard.
If you’re decorating a bag or garment, choose colors that contrast clearly with the background.
Make Mini Math Symbol Appliques
Use a lighter-weight yarn and smaller hook to create tiny versions.
These can work nicely on pencil cases, handmade cards, bookmarks, or small decorative patches.
Be careful with very small pieces intended for children, as detachable appliques can present a choking hazard.
Create Larger Classroom Decorations
Use worsted-weight cotton and a suitable hook for larger symbols.
You can also increase the number of chains and rows to make wider, longer bars.
For a wall display, consider attaching the finished symbols to fabric-backed squares.
This gives each mathematical sign a consistent background and makes the set easier to arrange.
Add a Decorative Border
If you want a more defined edge, experiment with a narrow round of slip stitches around a completed strip.
Work loosely so the border doesn’t pull the corners inward.
A contrasting color can make the symbols stand out beautifully.
This is optional and may be easier after you’ve made the basic version.
Experiment With Texture
Smooth single crochet is ideal for beginners because it creates clear, compact shapes.
Once you’re comfortable with the pattern, try using back-loop-only single crochet for a ridged effect.
Remember that textured stitches may change the width and flexibility of the strips.
For a matching set, use the same texture on every piece.
Creative Ways to Use Your Finished Symbols
These appliques can be used in many different handmade projects.
Try sewing them onto a plain tote bag for a math teacher, adding them to a classroom bulletin board, decorating a notebook cover, or making a personalized pencil pouch.
They can also become part of a fabric activity board when securely attached.
For a thoughtful handmade gift, combine the symbols with crocheted numbers to create simple equations.
A small collection of mathematical symbols can turn an ordinary handmade item into something personal and memorable.
Finishing Instructions
Once all five symbols are complete, take a few minutes to finish them neatly.
Fasten Off and Weave in Ends
Thread each remaining yarn tail through a tapestry needle.
On the wrong side of the crochet, weave the yarn through several stitches.
Change direction and weave through a few more stitches.
This helps prevent the ends from slipping out during use.
Trim the excess yarn carefully.
For pieces that still need to be attached to a background, keep one suitable sewing tail until the attachment is complete.
Block the Appliques
Blocking can help small crochet shapes lie flatter and look more even.
For washable cotton, lightly dampen the pieces and gently reshape them on a towel or blocking mat.
Straighten the rectangular bars and make sure the corners are reasonably square.
Allow everything to dry completely.
If you prefer steam blocking, keep the heat appropriate for the yarn and avoid pressing the iron directly onto the crochet.
Always check the yarn label before applying heat.
How to Sew Crochet Math Symbols onto Fabric
Place the applique on your chosen fabric.
Adjust its position until you’re happy with the placement.
Secure it temporarily with sewing pins.
Thread a tapestry needle with matching yarn.
Working around the edges, take small stitches through the applique and the fabric underneath.
Try to catch the outer edge of the crochet without pulling it out of shape.
For plus and multiplication signs, secure the overlapping center and the arms.
For equals and division signs, attach every separate component so the spacing stays correct.
Continue until the applique is firmly attached.
Weave in the sewing yarn on the wrong side of the fabric and trim the end.
Remove all temporary pins.
Washing and Care
Cotton appliques are generally easy to care for, but the finished item’s care requirements should always come first.
If you’ve attached the symbols to a bag or garment, follow the care instructions for both the base fabric and the yarn.
Gentle washing is usually preferable for small handmade decorations.
Avoid aggressive rubbing, especially around sewn edges.
Reshape the appliques while damp and let them dry flat when possible.
A Safety Note
These small crochet pieces are decorative appliques, not toys for babies or toddlers.
Loose dots, pins, magnets, buttons, or detachable pieces can create choking or injury hazards.
For items used around young children, sew every component securely and avoid small detachable accessories. Adult supervision is appropriate for educational activities involving small pieces.
Your Finished Crochet Math Symbol Set
You should now have five recognizable mathematical signs.
The plus and multiplication signs each use two crossed strips. The minus sign uses one horizontal strip. The equals sign uses two parallel strips, and the division sign combines a horizontal strip with two small dots.
The result is a coordinated set made from simple crochet components.
Quick Printable-Style Pattern Summary
Pattern: Easy Crochet Math Symbol Appliques
Skill level: Beginner
Yarn: DK cotton
Hook: 3.5 mm
Stitches: Chain, single crochet, slip stitch
Main strip pattern:
- Chain 15.
- Row 1: Single crochet in the second chain from the hook and across. (14 sc)
- Row 2: Chain 1, turn, single crochet across. (14 sc)
- Row 3: Chain 1, turn, single crochet across. (14 sc)
- Fasten off, leaving a sewing tail.
Make eight matching strips.
Small dot pattern:
- Chain 2.
- Work 6 single crochet stitches into the second chain from the hook.
- Slip stitch into the first single crochet.
- Fasten off.
Make two dots.
Assembly:
- Plus (+): Cross two strips perpendicularly.
- Minus (−): Use one horizontal strip.
- Equals (=): Position two strips parallel to one another.
- Multiplication (×): Cross two strips diagonally.
- Division (÷): Position one strip horizontally with a dot above and below.
Finishing: Secure the components, weave in ends, block gently, and sew onto your chosen fabric or backing.
Frequently Asked Questions
1. Is This Crochet Math Symbol Applique Pattern Suitable for Beginners?
Yes. The pattern uses only basic crochet stitches and simple assembly techniques.
If you already know how to chain and single crochet, you can make the rectangular strips.
The main challenge is keeping the pieces consistent and arranging them neatly.
Beginners may find it helpful to make the minus sign first because it requires only one strip and no complicated assembly.
Once you’re comfortable with that, move on to the plus and equals signs.
2. What Is the Best Yarn for Crochet Math Symbols?
Smooth cotton yarn is an excellent choice because it gives the symbols clear stitch definition and a relatively firm shape.
DK cotton works especially well for small appliques.
You can also use acrylic or cotton-blend yarn, but the final size and flexibility may change.
Avoid very fuzzy yarn if you want the mathematical shapes to remain clearly recognizable.
3. Can I Make These Crochet Appliques Without Sewing?
Some symbols require no assembly sewing.
For example, the minus sign is simply one finished rectangular strip.
However, the plus and multiplication signs need their overlapping strips secured, and the equals and division signs need a backing or base fabric to maintain the spacing between separate components.
If you prefer a no-sew project, you could explore a single-piece crochet construction in a future pattern.
4. How Do I Make the Crochet Math Symbols Bigger?
There are two easy options.
First, use thicker yarn with a suitable larger crochet hook.
Second, increase the number of foundation chains and rows in the rectangular strips.
For example, beginning with 19 chains instead of 15 will produce 18 single crochet stitches per row.
Keep the measurements consistent across the different pieces so your symbols remain balanced.
5. How Do I Keep My Crochet Appliques Flat?
Start with even tension and avoid making your foundation chains too tight.
Use a smooth yarn that holds its shape well.
After crocheting, gently block the pieces according to the yarn’s care instructions.
When attaching the applique, use relaxed sewing stitches so the fabric doesn’t gather underneath.
For larger symbols, securing the edges at several points can help prevent them from lifting.
6. Can I Use These Math Symbols on Baby Blankets?
You can use securely sewn decorative appliques on suitable blankets, but extra care is necessary with items intended for babies.
Avoid loose or detachable pieces, especially the small division dots.
Make sure every component is firmly attached and cannot easily be pulled free.
Decorative appliques should not be used as loose play pieces for infants or toddlers.
For sleep items, follow current safe-sleep guidance and avoid adding embellishments that could create hazards.
7. What Can I Make With Crochet Math Symbol Appliques?
These little symbols work well on many handmade projects.
You can use them to personalize a teacher’s tote bag, decorate a pencil case, create classroom displays, or add a playful detail to a handmade wall hanging.
They also pair beautifully with crochet numbers.
For a coordinated educational decoration, make several number appliques and arrange them with the mathematical signs to create simple equations.
Conclusion
A crochet math symbol applique pattern doesn’t need complicated shaping or advanced stitches to be useful.
With one basic rectangular strip, a pair of tiny crochet circles, and a little careful assembly, you can create five recognizable mathematical signs.
The project is quick, beginner-friendly, and a practical way to use leftover cotton yarn.
It’s also a nice opportunity to practice counting stitches, maintaining even tension, and sewing crochet pieces neatly onto fabric.
Once you’ve finished your first set, experiment with different colors or sizes to create something that suits your project.
Save this tutorial for your next small crochet project, and consider pairing your finished math symbols with crochet number appliques for a complete handmade educational collection.