School counselors do so much behind the scenes. They listen, encourage, help students navigate difficult moments, and create spaces where children feel supported. If you want to thank a school counselor with something personal, this easy crochet school counselor gift pattern is a lovely place to start.
Instead of buying another mug or desk decoration, you can make a small handmade heart bookmark that is both thoughtful and practical. It fits neatly inside a notebook, planner, or favorite book, and it uses only a little yarn.
The best part? You don’t need to be an experienced crocheter.
This beginner-friendly crochet project uses basic stitches to create a solid heart with a slim bookmark stem. The heart is worked in short rows, making it easier to understand how the shape develops. You’ll practice increasing, shaping rounded edges, keeping stitch counts consistent, and finishing your work neatly.
I’ve also included clear step-by-step guidance, image placements for every important construction stage, troubleshooting tips, and ideas for turning the finished bookmark into a beautiful counselor appreciation gift.
Whether you’re preparing something for School Counselor Appreciation Week, the end of the school year, or simply want to say thank you, this little crochet project can make a meaningful present.
What You’ll Learn
By the end of this tutorial, you’ll know how to:
- Make a small, solid crochet heart using simple rows.
- Increase stitches to create a pointed heart shape.
- Form two rounded heart lobes without complicated techniques.
- Crochet a narrow bookmark stem.
- Attach the stem securely and hide yarn ends.
- Customize the bookmark with colors and a handwritten appreciation card.
This is a great small project for using leftover cotton yarn, practicing basic crochet skills, and making several gifts without purchasing lots of supplies.
Project Overview
Difficulty
Beginner / Easy
Estimated time
45–75 minutes
Heart width
2–2.5 inches
Bookmark length
8–9 inches
Yarn
DK cotton, #3
Hook
3.5 mm
Finished dimensions are approximate. Make a small gauge sample if an exact size is important.
Materials You’ll Need
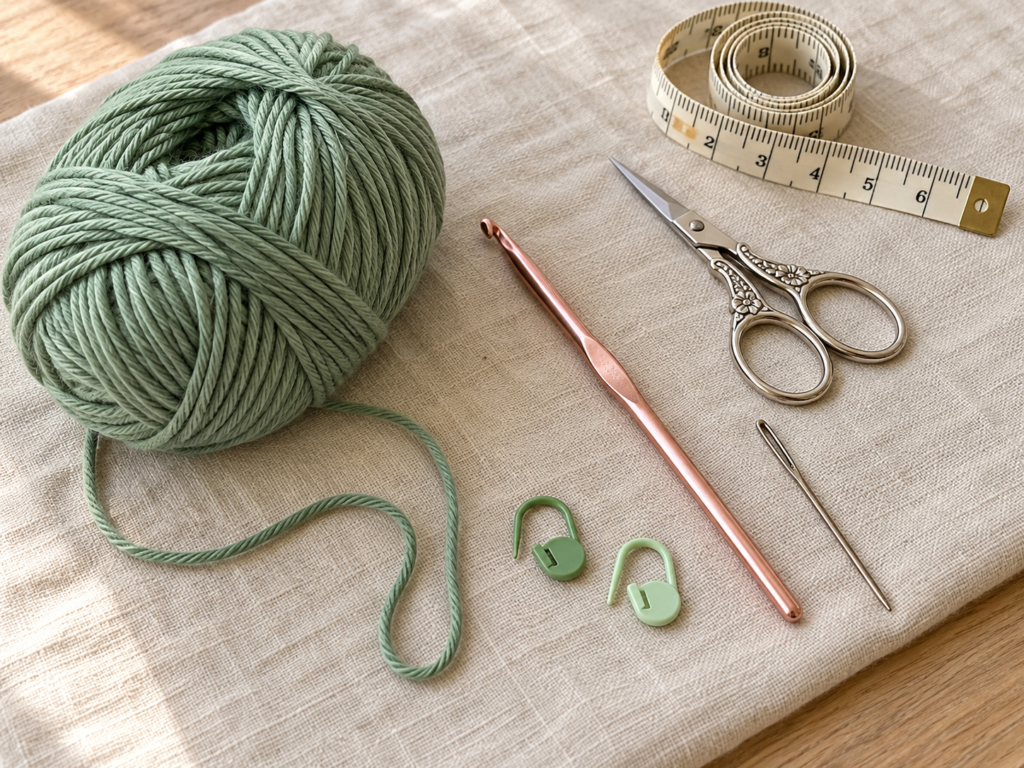
This crochet school counselor gift requires only a handful of supplies, most of which you may already have in your crochet basket.
Yarn: Approximately 15–25 yards of smooth DK weight cotton yarn. Cotton gives the heart a clean stitch definition and helps the finished bookmark lie relatively flat.
For this tutorial, use muted sage green. It’s a calming color that looks beautiful with cream stationery, natural paper, and wooden desk accessories.
Crochet hook: A 3.5 mm hook. If your stitches are very tight, try a 4 mm hook. If the fabric feels loose or floppy, use a slightly smaller hook.
Other supplies: Sharp scissors, a blunt tapestry needle, stitch markers, and a measuring tape.
Optional gift supplies: A small blank card, an envelope, tissue paper, or a simple paper gift sleeve.
Crochet Abbreviations Used
This tutorial uses US crochet terminology.
| Abbreviation | Meaning |
|---|---|
| ch | Chain |
| sc | Single crochet |
| hdc | Half double crochet |
| sl st | Slip stitch |
| st / sts | Stitch / stitches |
| inc | Increase (2 sc in one stitch) |
| dec | Single crochet decrease (sc2tog) |
| BLO | Back loop only |
| RS / WS | Right side / wrong side |
In UK crochet terminology, the US single crochet is called a double crochet. Check the terminology before using another tutorial alongside this pattern.
How to make the main stitches
Single crochet (sc): Insert your hook into the next stitch, yarn over, and pull up a loop. Yarn over again and pull through both loops on your hook.
Single crochet increase (inc): Work two single crochet stitches into the same stitch. This adds one stitch to your row.
Single crochet decrease (dec): Insert your hook into the next stitch and pull up a loop. Insert into the following stitch and pull up another loop. Yarn over and pull through all three loops.
Slip stitch (sl st): Insert your hook into the indicated stitch, yarn over, and pull through both the stitch and the loop already on your hook.
Before You Start
There are a few things worth understanding before you begin crocheting the heart.
Gauge and tension
Gauge isn’t critical for a decorative bookmark, but your stitches should be fairly firm and even.
For a flat bookmark, loose stitches can create gaps and make the heart look floppy. Very tight stitches, on the other hand, can cause the edges to curl.
Try making a few single crochet stitches first. The fabric should bend easily without feeling stiff or having large spaces between stitches.
Counting stitches
Every row in the heart has a specific stitch count.
When you make an increase at both ends of a row, your stitch count grows by two. When you make decreases, the row becomes narrower.
Count the V-shaped tops of your stitches, not the turning chain. In this pattern, the turning chain does not count as a stitch.
Keeping edges straight
One of the most common beginner mistakes is accidentally adding an extra stitch at the end of a row.
To avoid this, place a stitch marker in the first stitch of each row when necessary. This makes it easier to identify the correct final stitch after turning.
Choosing colors
Sage green is the sample color, but you can use dusty blue, lavender, soft pink, mustard yellow, or cream.
If you’re making several bookmarks for different school staff members, choosing a coordinated color palette can make the gifts look especially thoughtful.
Understanding the construction
The project is made from two separate crocheted pieces:
- One solid heart motif, crocheted from its bottom point upward.
- One narrow rectangular bookmark stem, crocheted in single crochet rows.
The stem is sewn to the back of the heart, creating one flat bookmark.
This construction avoids complex magic rings and gives beginners more control over the finished shape.
Step-by-Step Crochet Tutorial
Step 1: Make the Foundation Chain
Start with your sage green cotton yarn and 3.5 mm crochet hook.
Make a slip knot and place it on your hook. Adjust the loop so it slides smoothly without being too loose.
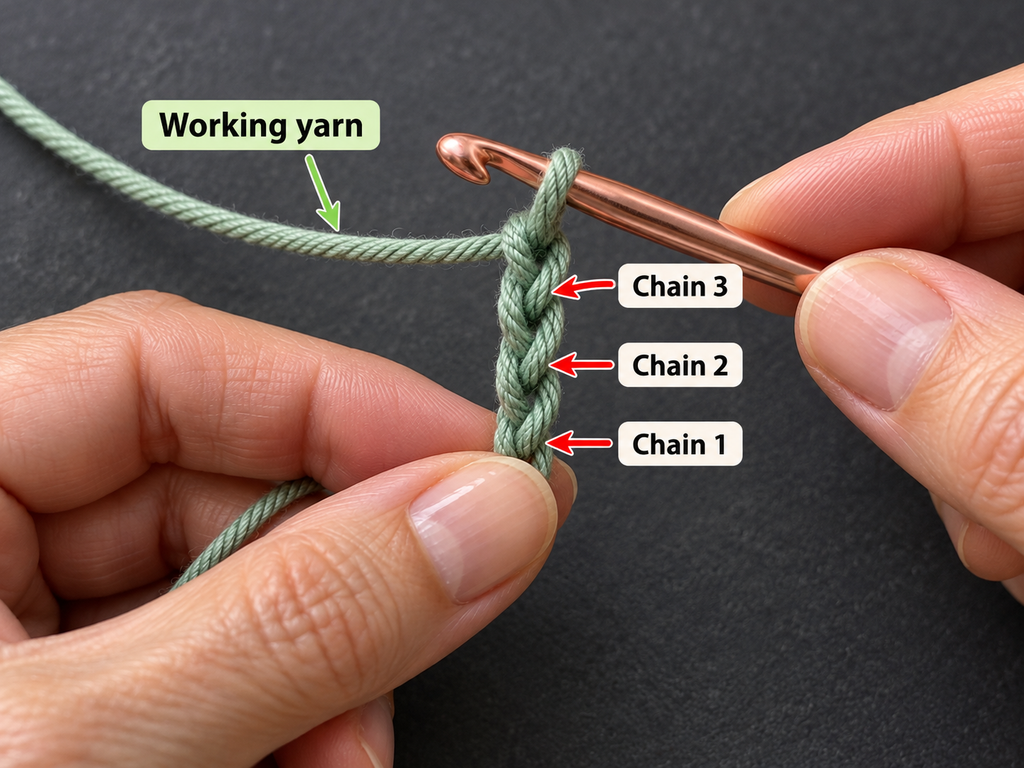
Chain 3.
To make a chain, yarn over and pull the yarn through the loop on your hook. Repeat until you have three chains.
Look carefully at the chain before continuing. Each chain should have a small V shape on the front.
You will work into the second chain from your hook in the next step.
Beginner tip: Don’t pull your foundation chain too tightly. A tight chain can make it difficult to insert the hook and may cause the bottom point of the heart to curl.
Common mistake to avoid: Counting the loop on your hook as a chain. That loop is not included in your three-chain count.
Step 2: Crochet the First Row
Now we’ll make the pointed bottom of the heart.
Insert your hook into the second chain from the hook.
Work one single crochet.
Move to the next chain and work another single crochet.
You should now have two single crochet stitches.
Row 1: Sc in the second ch from hook and in the next ch. (2 sts)
Chain 1 and turn your work.
This first row may look very small, but it forms the foundation of the entire heart. As you continue increasing, the fabric will gradually develop a triangular shape.
Beginner tip: Use your fingers to gently flatten the first row so you can see the two stitches clearly.
Common mistake to avoid: Working into the third chain from the hook instead of the second. This changes the starting stitch count.
Step 3: Increase to Form the Heart’s Lower Point
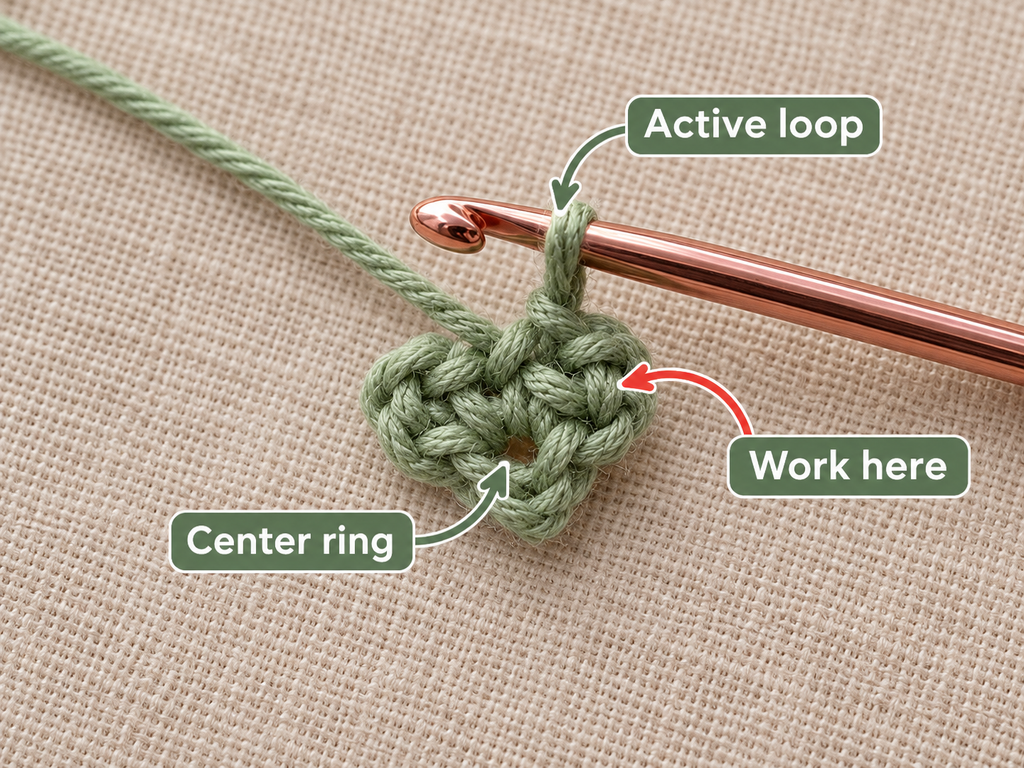
The heart begins at the bottom and gradually widens toward the top.
We will add one stitch at each end of every increase row.
For Row 2, work two single crochets into the first stitch and two single crochets into the second stitch.
You now have four stitches.
Chain 1 and turn.
For the following rows, work an increase in the first stitch, single crochet across the middle stitches, and make another increase in the last stitch.
Follow this sequence:
| Row | Instructions | Stitch count |
|---|---|---|
| 2 | Inc in each stitch | 4 |
| 3 | Inc, sc 2, inc | 6 |
| 4 | Inc, sc 4, inc | 8 |
| 5 | Inc, sc 6, inc | 10 |
| 6 | Inc, sc 8, inc | 12 |
| 7 | Inc, sc 10, inc | 14 |
Chain 1 and turn after each row, including Row 7.
As you work, you’ll notice the lower point growing wider. The increases create gently sloping edges that eventually form the lower half of the heart.
Try to keep the increases symmetrical. If you forget an increase on one side, the heart may lean to the left or right.
Beginner tip: Count your stitches at the end of every row. It’s much easier to correct a mistake immediately than after several more rows.
Common mistake to avoid: Working only one single crochet into the final stitch. Both edges need an increase on each of these rows.
Step 4: Work the Straight Rows
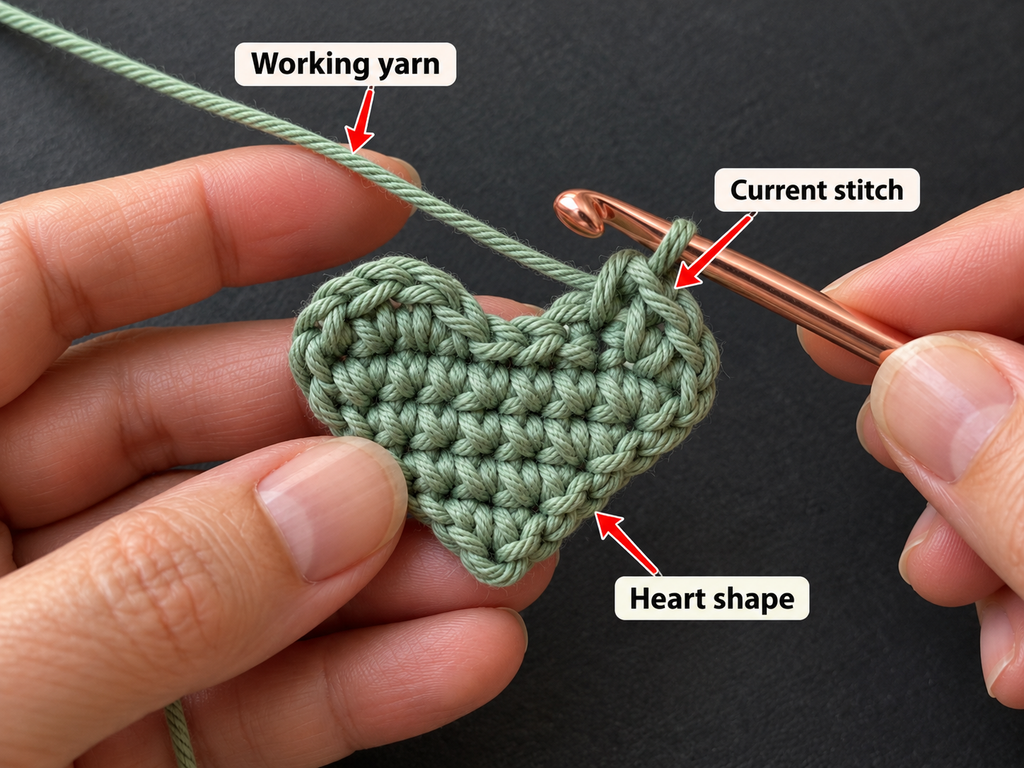
Once you have 14 stitches, it’s time to create a short section with no increases.
This section provides enough width for the two rounded lobes at the top.
Row 8: Sc in each stitch across. (14 sts)
Chain 1 and turn.
Row 9: Sc in each stitch across. (14 sts)
Chain 1 and turn.
Row 10: Sc in each stitch across. (14 sts)
Chain 1 and turn.
Your crochet piece should now have a pointed lower half and a short rectangular section at the top.
The heart will become more recognizable when we shape the two upper lobes.
Check that both side edges are reasonably straight and that your last row contains exactly 14 stitches.
Beginner tip: Place a marker after the seventh stitch to identify the center of the heart. You’ll use this center division in the next steps.
Common mistake to avoid: Accidentally making an increase in the first stitch out of habit. These three rows must stay at 14 stitches.
Step 5: Shape the First Rounded Heart Lobe
Now we’ll divide the top of the heart into two sections.
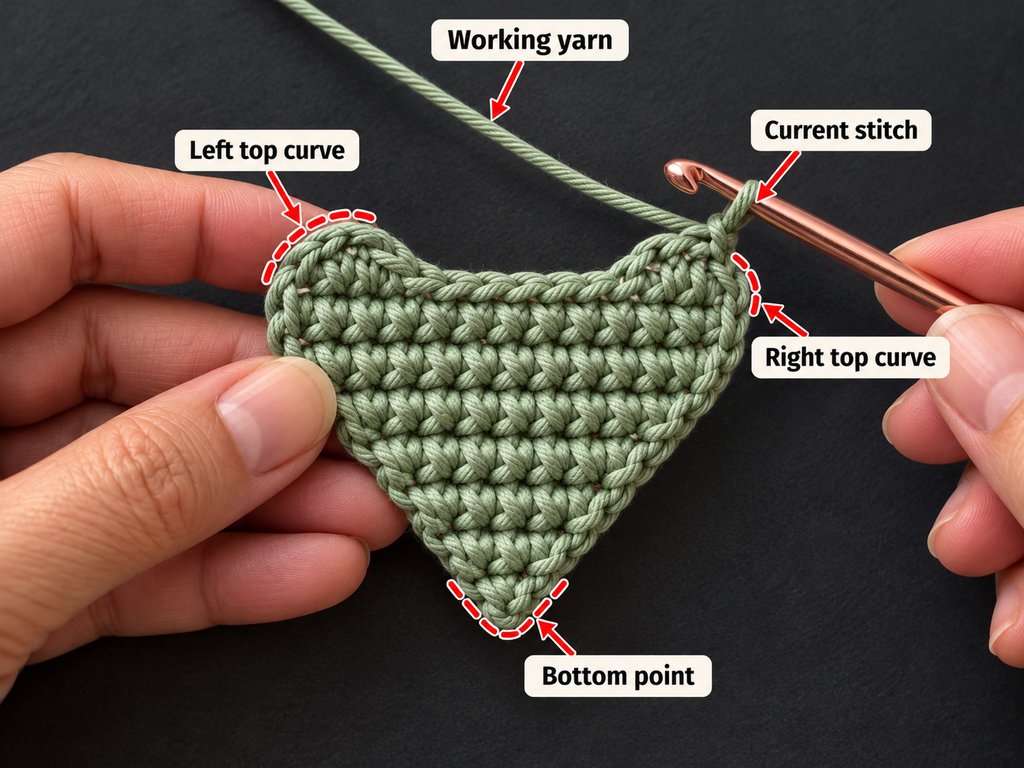
Each lobe begins with seven stitches.
You are currently at one outer edge of the heart, ready to work across Row 11.
First lobe, Row 11: Sc in the first 7 stitches. Leave the remaining 7 stitches unworked. (7 sts)
Chain 1 and turn.
Row 12: Dec, sc 3, dec. (5 sts)
Chain 1 and turn.
Row 13: Dec, sc 1, dec. (3 sts)
Fasten off, leaving a short tail for weaving in later.
The first lobe will have a slightly stepped rounded edge. This is normal with short-row shaping.
If the lobe looks a little angular, don’t worry. Gentle shaping and blocking will help soften its appearance.
Beginner tip: Work the decreases slowly. Make sure you’re combining two stitches into one, rather than skipping stitches.
Common mistake to avoid: Crocheting all 14 stitches in Row 11. You should work only the first seven stitches so the other half remains available for the second lobe.
Step 6: Crochet the Second Heart Lobe
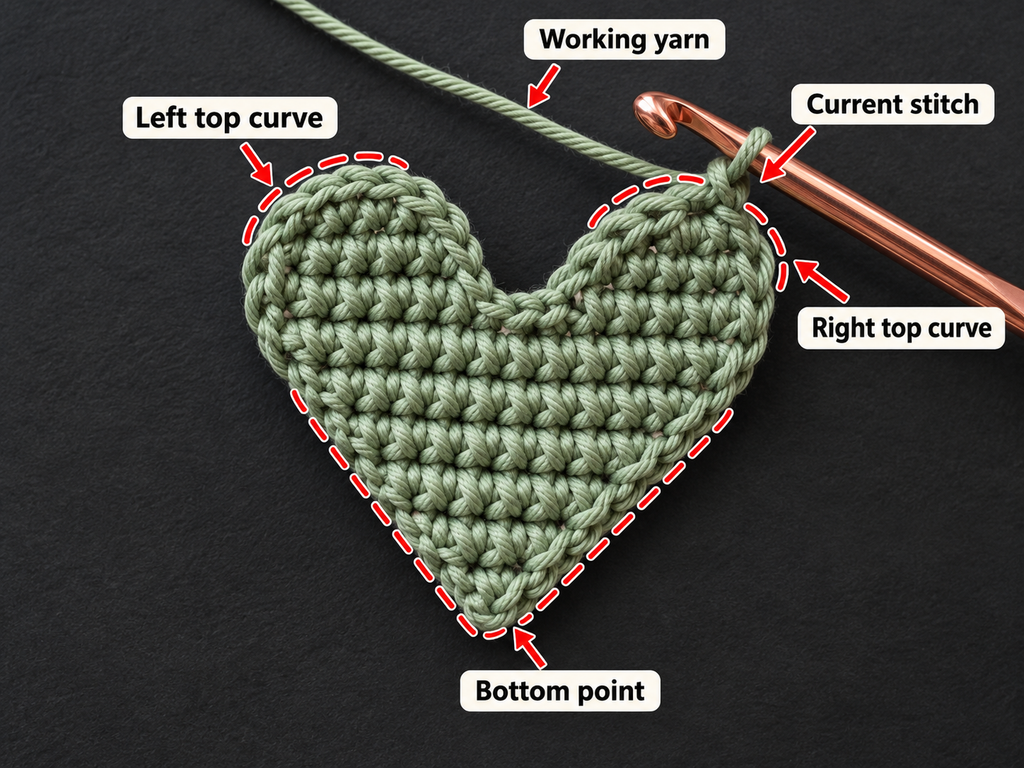
The second lobe is made in the same way as the first.
With the same side of the heart facing you as when you began Row 11, attach your yarn to the first unworked stitch beside the center division.
You should have seven unworked stitches available.
Second lobe, Row 11: Sc across the remaining 7 stitches. (7 sts)
Chain 1 and turn.
Row 12: Dec, sc 3, dec. (5 sts)
Chain 1 and turn.
Row 13: Dec, sc 1, dec. (3 sts)
Fasten off.
You should now have a complete heart shape with two rounded upper lobes and a small dip between them.
Lay the heart on a flat surface and gently smooth the edges with your fingers.
The two lobes should be approximately equal in height. If one looks taller, compare the row counts before proceeding.
Beginner tip: The heart doesn’t need to be perfectly symmetrical to look beautiful. Handmade stitches naturally have small variations.
Common mistake to avoid: Starting the second lobe on the wrong side of the fabric. This can make the row textures face in different directions. Keep the same orientation used for the first lobe.
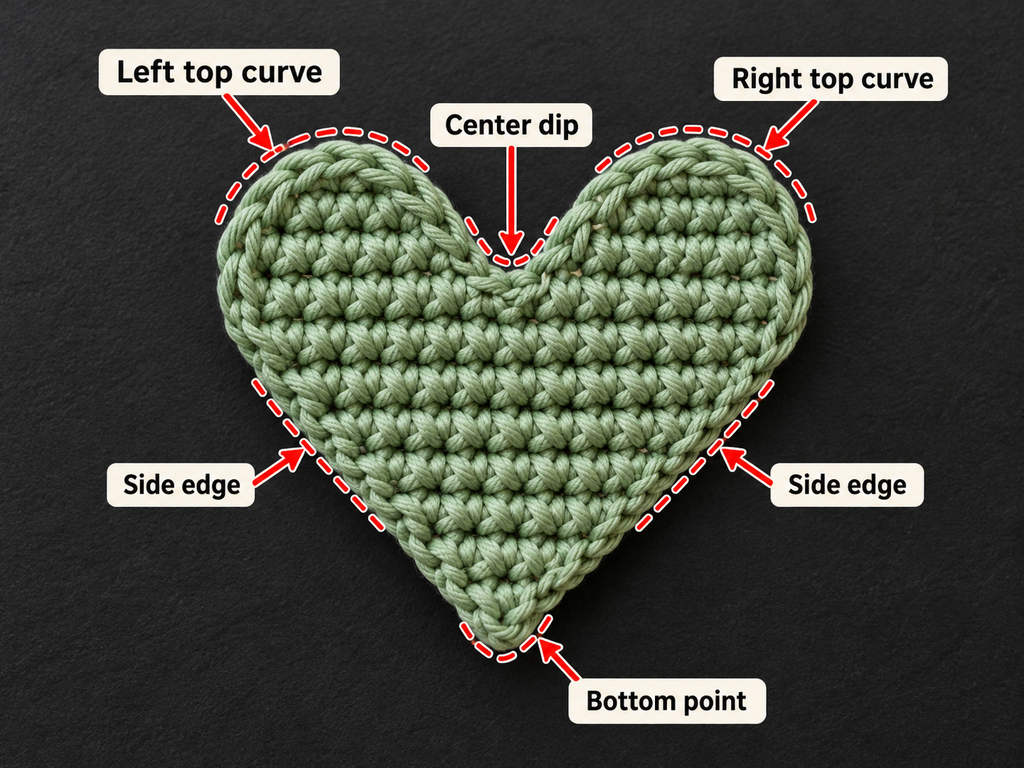
Step 7: Check the Heart and Add an Optional Edge
Before making the bookmark stem, examine the heart carefully.
The center notch should be visible, and the bottom point should be centered beneath it.
Use your fingers to gently adjust the shape.
If you want a more finished edge, you can add a loose round of slip stitches around the outer perimeter.
Attach yarn at a side edge. Work one slip stitch into each accessible edge stitch or row-end space, adjusting the spacing around the curved lobes.
At the center notch, avoid crowding the stitches. One loose slip stitch is usually enough to maintain the indentation.
At the bottom point, work a slip stitch into the tip without pulling it too tightly.
Join, fasten off, and weave in the tail.
This edging is optional. Beginners may prefer leaving the heart plain because a tight slip-stitch border can make the fabric curl.
Beginner tip: Test a few edging stitches first. If the heart begins to pucker, remove them and work with looser tension.
Common mistake to avoid: Adding too many stitches along the curved edges. Excess stitches can cause ruffling, while tight stitches can shrink the heart.
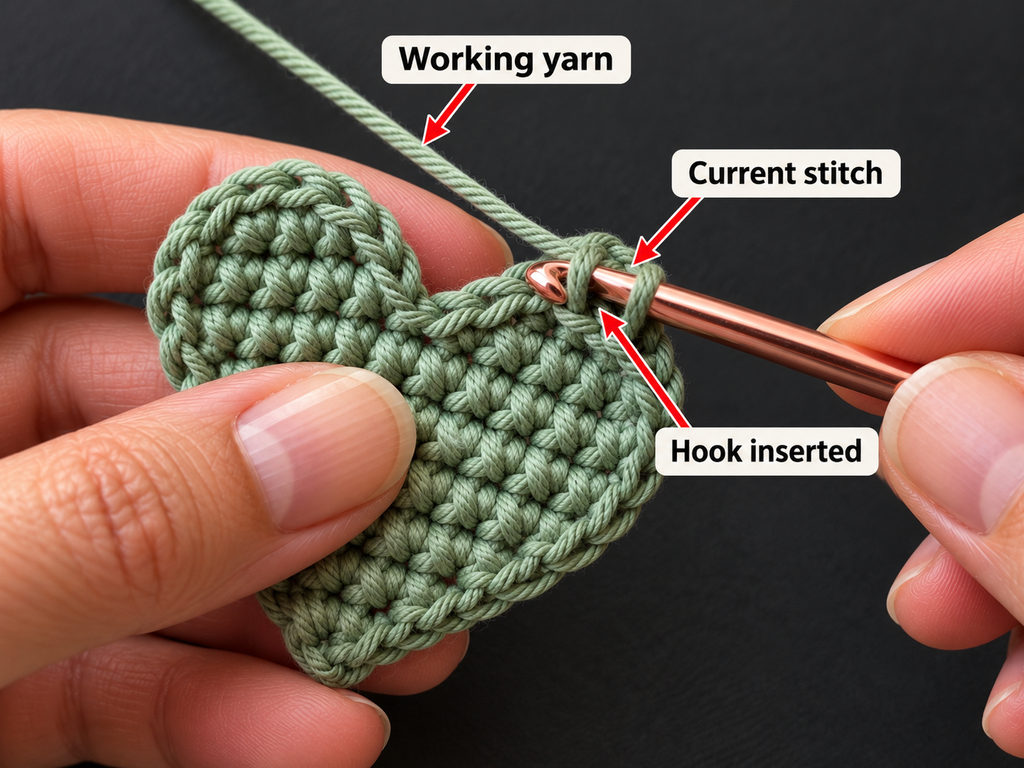
Step 8: Crochet the Bookmark Stem
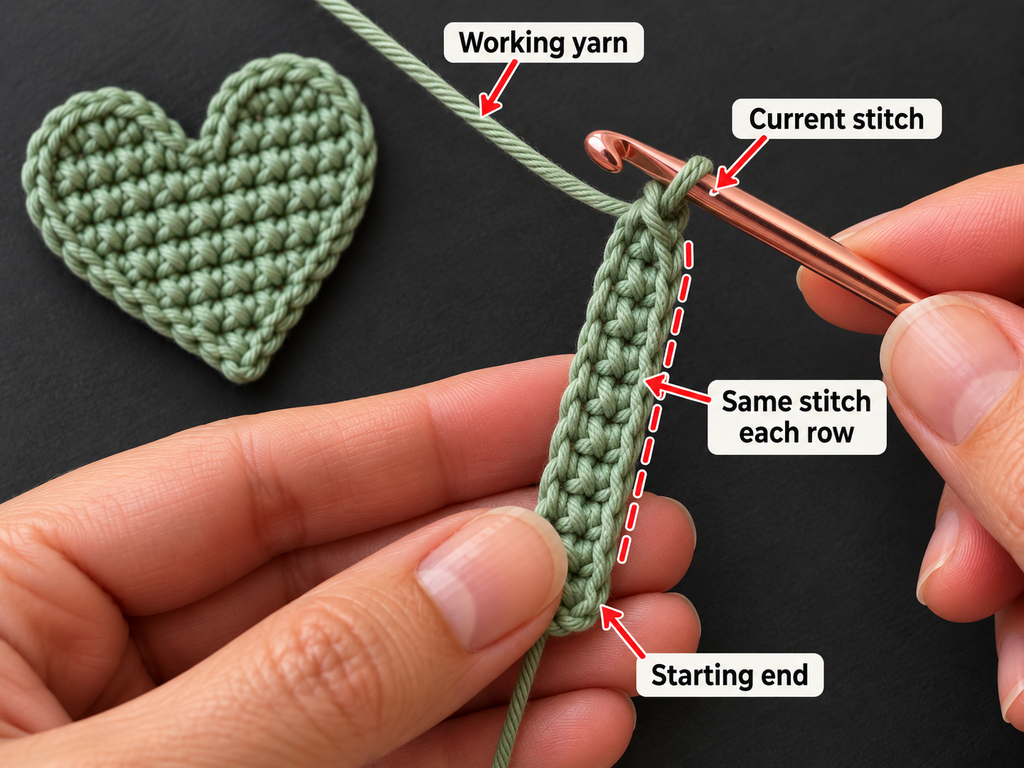
Now we’ll make the long, narrow strip that sits between the pages of a book.
Unlike a chain-only bookmark, this stem is a small flat piece of fabric. It has enough structure to stay straight while remaining thin.
Start with a new length of sage green yarn.
Chain 4.
Row 1: Sc in the second chain from the hook and in each remaining chain. (3 sts)
Chain 1 and turn.
Row 2: Sc across. (3 sts)
Chain 1 and turn.
Repeat Row 2 until the strip measures approximately 6.5–7 inches (16.5–18 cm), or your preferred length.
For a typical DK cotton tension, you may need roughly 40–55 rows, but measure rather than relying on an exact row count.
Keep all rows at three stitches.
When the strip reaches the desired length, fasten off, leaving a 10-inch yarn tail for attaching it to the heart.
Beginner tip: If the stem begins to twist, check that each row contains three stitches and that your turning chains are not too tight.
Common mistake to avoid: Adding a stitch at the end of each row. This gradually widens the stem instead of keeping it narrow.
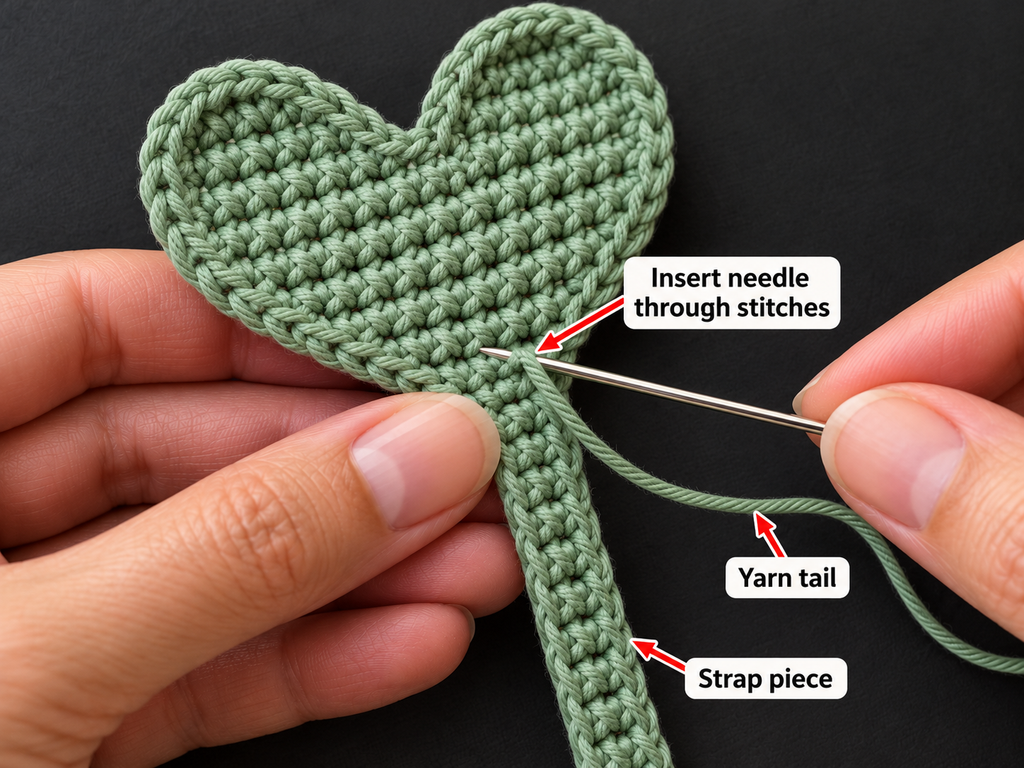
Step 9: Attach the Stem to the Heart
Lay the heart on your work surface with its wrong side facing up.
Place one end of the bookmark stem against the lower point of the heart.
Overlap the two pieces by approximately half an inch.
Thread the long yarn tail from the stem through your tapestry needle.
Using small whipstitches, sew the stem to the back of the heart. Pass the needle through the edge loops of the stem and the back loops of the heart fabric.
Try not to push the needle completely through to the front of the heart. Keeping the stitches mostly on the back creates a neater appearance.
Make several secure stitches, then weave the yarn tail through the back of the heart.
Turn the bookmark over and check that the stem hangs straight from the bottom point.
Beginner tip: Use a stitch marker to hold the stem in place before sewing. This prevents the pieces from shifting.
Common mistake to avoid: Attaching the stem too far to one side. The bookmark will hang crooked if the stem isn’t centered beneath the heart.
Step 10: Shape and Inspect the Bookmark
Your crochet school counselor gift is almost finished.
Place the bookmark flat on a clean towel.
Check that the heart is centered above the stem and that the fabric lies smoothly.
If the heart curls slightly, lightly dampen it with water and gently reshape it.
Pin the heart into a symmetrical shape if necessary, using rustproof pins and a suitable blocking mat.
Allow it to dry completely before removing the pins.
Don’t stretch the heart too much. You want to preserve the natural shape of the stitches rather than flattening them aggressively.
Once dry, place the bookmark inside a notebook to check its thickness and length.
The stem should sit comfortably between the pages, while the heart remains visible near the top.
Beginner tip: A soft cotton bookmark may need only gentle finger shaping instead of full wet blocking.
Common mistake to avoid: Using excessive heat or stretching the fabric while wet. This can distort the heart and make the edges uneven.
Pattern Notes and Stitch Counts
Here is a quick reference to help you check your progress.
Heart construction
The heart begins with two stitches and grows by two stitches per increase row.
Rows 2–7 increase from 4 to 14 stitches.
Rows 8–10 remain at 14 stitches.
The heart is then divided into two groups of seven stitches.
Each lobe is worked over three rows, decreasing from seven stitches to five and finally three.
Turning chain rule
Chain 1 at the end of each row before turning.
The turning chain does not count as a stitch.
Your first single crochet should be worked into the first actual stitch of the previous row.
Right side and wrong side
Because the heart is crocheted in turned rows, both sides look similar.
Choose the smoother or more attractive side as the front.
For the stem attachment, place the sewing stitches on the back so the front remains tidy.
Size adjustment
For a larger heart, continue the paired increases for another row or two before working the straight section. You’ll then need to divide the top evenly and adjust the lobe decreases.
For a smaller heart, stop increasing earlier.
Changing the yarn weight and hook size is another easy way to alter the finished dimensions, though the fabric’s thickness will also change.
Common Beginner Mistakes and How to Fix Them
1. The heart looks uneven
This usually happens when one increase is missed or an extra stitch is added.
Fix: Count your stitches after every increase row. Each new increase row should have exactly two more stitches than the previous row.
2. The heart curls inward
Curling can happen when your tension is too tight or the hook is too small for the yarn.
Fix: Try loosening your tension or moving up half a hook size. Gentle blocking can also help.
3. The center notch disappears
If the two heart lobes are worked too closely together or the edging is too tight, the center dip may become difficult to see.
Fix: Check that each lobe is worked separately and avoid crowding the notch with edging stitches.
4. The bookmark stem becomes wider
This happens when you accidentally work into the turning chain.
Fix: Count three single crochet stitches on every stem row. Place a marker in the first stitch if necessary.
5. The stem twists
A narrow strip can twist if the rows are uneven or the tension changes.
Fix: Smooth the stem regularly as you crochet. If it continues twisting, check your stitch count and consider gentle blocking.
6. The yarn ends become visible
Short yarn tails can work their way out of the stitches after handling.
Fix: Leave tails long enough to weave through several stitches, change direction, and weave back through another section.
7. The bookmark feels too thick
Bulky yarn or very loose stitches may create a bookmark that doesn’t sit comfortably inside a book.
Fix: Choose smooth DK or sport-weight cotton yarn and use a slightly smaller hook to create a firm, relatively thin fabric.
How to Customize This Crochet School Counselor Gift
One of the nicest things about a handmade gift is the ability to personalize it.
Choose meaningful colors
Soft blue and green shades create a calm, peaceful look.
Lavender gives the bookmark a gentle, cheerful feel.
Cream or beige works well for a minimalist gift.
You can also use the counselor’s favorite color if you happen to know it.
Make a two-color heart
For a subtle color variation, crochet the lower heart in one color and change yarn before the straight rows.
For example, use sage green for the lower point and cream for the top lobes.
Make the stem in either color to tie the design together.
Add a decorative border
If you’re comfortable with edging, try working a round of single crochet in a contrasting color.
Keep the stitches loose around the curves.
A simple border can make the heart stand out without adding complicated details.
Change the stem texture
The basic pattern uses regular single crochet stitches.
For a slightly ridged texture, work the stem in back loop only (BLO) single crochet.
This creates visible horizontal lines and gives the bookmark a different handmade appearance.
Add an embroidered initial
If you know the counselor’s initial, you can embroider a small letter onto the heart using a tapestry needle and contrasting yarn.
Keep the embroidery simple so the bookmark stays flat.
Create a matching gift set
Make two or three bookmarks in coordinating colors.
Tie them together with a small piece of cotton ribbon or place them inside a handmade paper envelope.
You could also pair the bookmark with a notebook, journal, or handwritten card.
Gift ideas and occasions
This project works well for school counselor appreciation, school staff thank-you gifts, graduation-season gifts, end-of-year presents, and small handmade gifts for educators.
It can also be adapted for teachers, librarians, reading specialists, or school office staff.
Finishing Instructions
Finishing is what transforms a simple crochet project into a polished handmade gift.
Fastening off
After completing your final stitches, cut the yarn while leaving a tail long enough to weave in.
Pull the tail through the final loop and tighten gently.
Avoid pulling so hard that the last stitch becomes distorted.
Weaving in ends
Thread the yarn tail through a blunt tapestry needle.
On the wrong side of the fabric, weave the needle beneath several stitches.
Change direction and weave through another small section.
Trim the remaining yarn close to the fabric without cutting the crochet stitches.
Repeat for every loose tail.
Blocking and shaping
If necessary, lightly dampen the heart and lay it flat.
Gently shape the upper lobes and center point with your fingers.
Allow the bookmark to air-dry completely.
For cotton yarn, mild wet blocking is generally suitable, but always follow the yarn label’s care instructions.
Washing and care
Hand-wash the bookmark gently in cool or lukewarm water with a mild detergent suitable for the yarn.
Press out excess moisture with a towel rather than wringing.
Reshape and dry flat.
Avoid storing the bookmark while damp.
How to Present Your Handmade Counselor Gift
A handmade gift doesn’t need expensive packaging to feel special.
Place the finished bookmark inside a small cream envelope or attach it to a blank appreciation card.
A handwritten message can explain why you’re grateful for the counselor’s support.
For example, you might write:
Thank you for the kindness, patience, and encouragement you share with students every day. Your work makes a difference.
You can also tuck the bookmark inside a small journal or planner.
If you’re preparing several gifts, use the same wrapping style for each one. Coordinated envelopes and matching yarn colors create a professional appearance while keeping the gifts personal.
For a school setting, avoid attaching small beads or loose decorations that could easily fall off. A simple crocheted heart is attractive on its own.
Quick Printable-Style Pattern Summary
Easy Crochet Heart Bookmark
School Counselor Appreciation Gift · US Terms
Skill level: Beginner
Materials: DK cotton yarn, 3.5 mm hook, scissors, tapestry needle
Stitches: ch, sc, inc, dec, optional sl st
Heart:
- Ch 3; Row 1: 2 sc.
- Rows 2–7: Inc at both ends of every row, reaching 14 sts.
- Rows 8–10: Sc across (14 sts).
- First lobe: 7 sc, then decrease to 5 sts, then 3 sts.
- Second lobe: Repeat over the remaining 7 stitches.
Stem:
- Ch 4; work 3 sc across.
- Repeat 3-sc rows to approximately 6.5–7 inches.
Finishing: Sew the stem to the back of the heart, weave in all ends, and block gently if needed. Copy quick pattern
Frequently Asked Questions
1. Is this crochet school counselor gift pattern suitable for beginners?
Yes. The pattern mainly uses chains, single crochet, increases, and decreases.
If you can make a foundation chain and work single crochet stitches, you can learn the remaining techniques as you go.
The heart shaping requires careful counting, but each row is short and manageable.
2. How long does it take to crochet a heart bookmark?
Most beginners can finish one in approximately 45–75 minutes.
If you’re already comfortable with single crochet and increases, you may complete the project more quickly.
The finishing and gift packaging may take a few extra minutes.
3. What yarn is best for a crochet bookmark?
Smooth cotton yarn is an excellent choice because it provides clear stitch definition and creates a relatively flat fabric.
DK weight cotton works well for this design.
You can also use sport-weight cotton for a smaller, thinner bookmark.
Very bulky or fuzzy yarn is less suitable because it makes the bookmark thicker and can hide the stitch details.
4. Can I make this gift for a male school counselor?
Absolutely. A handmade gift can be customized for anyone.
Choose colors that suit the recipient’s preferences, such as navy blue, forest green, gray, or cream.
The heart represents appreciation and kindness, making it appropriate for many recipients.
5. How can I make the bookmark longer?
Simply continue crocheting the narrow stem until it reaches your desired length.
For a longer notebook or planner, add more rows.
For a shorter book, make fewer rows.
The heart itself does not need to change.
6. Can I sell bookmarks made from this pattern?
This article presents an independently written original design. You may make finished bookmarks for personal gifts or sale using these instructions.
Do not reuse the third-party reference photographs without permission, and create your own product photography.
7. What should I write on a school counselor appreciation card?
A short, sincere message is often best.
You can thank the counselor for supporting students, helping them feel heard, or making the school environment more welcoming.
If the gift is from a student, a simple personal note may be especially meaningful.
Conclusion
Making a crochet school counselor gift is a wonderful way to turn a small amount of yarn into something meaningful.
This easy heart bookmark combines simple stitches, beginner-friendly shaping, and practical everyday use. It doesn’t require expensive supplies or advanced crochet skills, yet the finished project feels thoughtful and personal.
Choose a color you love, take your time with the heart shaping, and finish the gift with a handwritten note.
Whether you’re making one bookmark or several for school staff members, each handmade heart is a small reminder of appreciation.
Save this tutorial for your next school appreciation project, and consider trying a matching crochet pencil topper or mini heart keychain when you’re ready for another quick gift.